Sunday, November 13, 2011

mirror, mirror on the wall

i have a few little DIY projects for the kitchen walls that i've been working on and wanted to share.

and yes - one of them is a mirror.

i found this gold mirror at my grandmothers a few months back.  she is a gold mine for old stuff in good condition.  and if it's upstairs, it's probably fair game.

so, i brought it home and thought through where the best place for it would be.  once i figured out the best place, i would be able to figure out what color i wanted to spray it.

i finally decided on the kitchen.  the only wall that has anything on it is the wall of photos.  the walls are kind of lacking in decor. 

here's what the mirror looked like when i found it.

i forgot to take a picture with the mirror in it...

and here she is with a fresh coat of paint


awesome huh?  well, not picture of me, but the mirror it's self.  i love stuff like this!  and i love the transformation just a simple coat of spray paint can accomplish!

the back door is pretty much directly across from the mirror and it's the door we use all the time.  the mirror is in the perfect spot for a last minute hair check.  =)

i also wanted to add something to another wall in the kitchen.

this one.  the one to the right of the window.


i don't really have a lot of the blue i've used through out the kitchen on this side of the room.  the blue of that little table.

the other day i was at target and ran across these plates.


.89 cents for the big ones, .78 cents for the little ones.  i kind of fell in love with them.  had to have them. but i didn't want them to just sit in a cabinet...

so, i decided to hang them.  bring in my blue, and now i would get to look at these awesome plates all the time.

so, a little DIY was in order.

i had the hubs pic up some little ring hangers for pictures at home depot.  then, we gorrilla glued them to the back of the plates.


24 hours later, the glue had had plenty of time to dry and they were ready to hang.


i love them!  simple, cheap and i think they look great.  just what i was looking for!


that's it!  just a little spruce up for the kitchen walls.

on a side note, i've been feeling a craft urge lately.  hopefully i'll have some cute stuff to share soon.

have a good monday friends!

Tuesday, November 8, 2011

gray & yellow master - updated and revealed!

i finally got our little bedroom make-over finished.  well, i finally got it photographed.

it's not much, but i'm really pleased with the change.  our room was in need of something.  it wasn't awful, but it wasn't fun.

before...


 kind of bland, and not much going on.

so, i browsed around pinterest and showed you pictures of ideas i had in this post.


well, here she is!  just a little fancier.


i got the idea from here to have some empty frames.  i really love the pop of yellow on the gray walls.  i got these frames from TJ Maxx for like $6.  they were gold and kind of crazy.  i took out the glass, spray painted them yellow and then hung them.  easy and i love it!

the black frame below has some yellow fabric in it.  no glass.  i planned on leaving the glass in, but then i broke it trying to get it out.  i actually like it better this way.  fabric is just a fat quarter from Joann's.  i think maybe $1.  there was plenty for both frames on either side of the bed.


as you saw in the first post about our bedroom, this wall of photos didn't move or change.  well, it's kind of changed now.  all of these pictures have been replaced with our more recent pictures that i showed you in my last post.  the only thing i added was the word "family."  i found it at Michael's in the dollar bins.  

the silhouette print doesn't really go with the color scheme (it's kind of a pinky red), but i love it too much to move it.  it was a valentine's gift last year.  in the middle of the hands, there is a little s + j.  they can be found here.  such a great website with so many sweet things. 


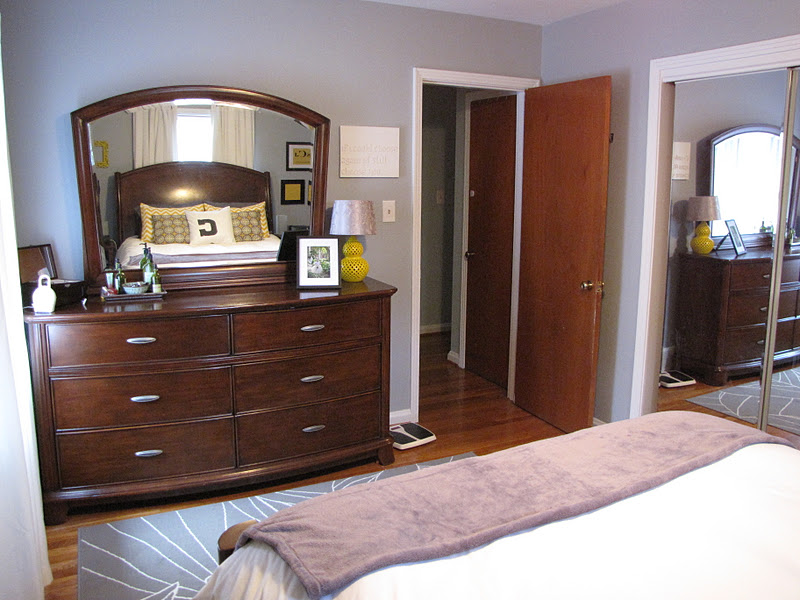
this is shaun's side of the bed.  i did the same thing with the yellow frames you see about the chest of drawers as i did on the other side.  i decided not to put them in the exact same spot on his side because i didn't want too much symmetry. 


what i did add to his side of the bed was our monogram.  i got the idea from pinterest, of course. it's hard to tell in these awful pictures, but i found some pretty yellow paper from Micheal's and just printed on the paper using our home printer.  it was easy, cheap, and i really like the way it turned out.


here's the other side of the room.  not much changed here.
the only thing different is this lamp.  it was there before, but it was brown wood with a cream shade.  the lamp was pretty much the exact same color as our dresser.  so, i sprayed it the same yellow as the open picture frames and bought a new shade.  i really like the shade, but i'm not sold on it in here.  i origianlly wanted a white drum shade, but that is strangely hard to find.  at least in the budget friendly places i'm looking...

also, above the lamp is the art i told you about in the first post.  i found the art here on pinterest and just decided to give it a whirl.  the canvas isn't as big as the nice expensive one, but it's a good size for our room.  it was really easy and turned out cool.  i gave it to shaun for our anniversary this year.


here is a closer look at our bed and the pillows i made.  i LOVE them all!

i loved the idea of the simple monogram pillow that i found here, so i bought some charcoal gray fabric and sewed a C on to some white fabric i already had.  the smaller gray and yellow pillows were made from fabric i already had.  and the big chevron pillows were made from some fabric i bought just for this little makeover.  they were actually my starting point of yellow.  i've been crazy about wanting chevron somewhere lately, so once i saw this fabric, i knew it would be my yellow.


so, that's it!  what do you think?  i think that total for everything was right around $100.  some new bedding, new art and a few DIY projects can really go a long way!  the only other thing i want to update are the bedside lamps.  i think these are too small, but i haven't seen anything out there that i like, so they are staying.

any suggestions?  what color should they be?

thanks for taking a look!  have a great tuesday!

Friday, November 4, 2011

family pictures

a couple of weeks ago we had family pictures taken to capture C at age 2.

i couldn't be happier about they way they turned out!  honestly, i'm having a hard time deciding which ones to print. 


the photographer brought a feather duster - genius!  


seriously?  could this be any sweeter?!?!  closed eyes.  her little hand on her heart.  these two share a pretty special connection.  i love that it's captured like this!


this one is probably my favorite.  everything about it is wonderful.  the brick, her lips and eyes.  perfect!


we still have so many more great ones - but i'm saving those for our christmas cards.

if you're local, and you want to know more about our photographer, check out her website here.  she has 3 kids of her own, so i really felt like she knew just what to do to make our session fun and relaxed.

sorry for the picture overload!  have a great weekend!!

Wednesday, November 2, 2011

halloween weekend

C and i headed to western ky this past weekend to visit some good friends while daddyboi headed up to MI to go to a football game.   we girls don't make too many trips like this alone, but saturday morning we loaded up the car and headed off.  some of us had a more relaxing trip that others...


C was minnie mouse this year! and since we were invited to a party that required me to dress up as well, i went for mickey.  sort of.  i got really crafty and make C's ears and skirt.  but then i ran out of steam.  my costume consisted of red shorts over leggings, a black t-shirt with little silver mickey's and minnie mouse ears.  whoops...  whatevs.  no one cared what i looked like, and i was comfy.  


 love this picture.  i asked them to smile, so they smiled at each other

C and i made our way home on monday to a waiting daddy.  she kind of understood what trick or treating was this year.  well, she at least understands the treat part!


hope you had a safe and fun halloween too!!